

Project Solutions
iAccess--an intelligent access control system (6)
Published:2011/7/28 21:21:00 Author:Li xiao na From:SeekIC
Design by I. Joostens
Overview of the menu structure
The menu structure is quite simple and intuitive. If you use Table 1 as a reference, you should not have any significant problems. Nevertheless, a few remarks are in order with regard to keys and access privileges (which are called ’access rights’ in the menus). A particular iButton can only be stored once in the memory. If you try to program the same iButton into the system more than once, an error message will appear. 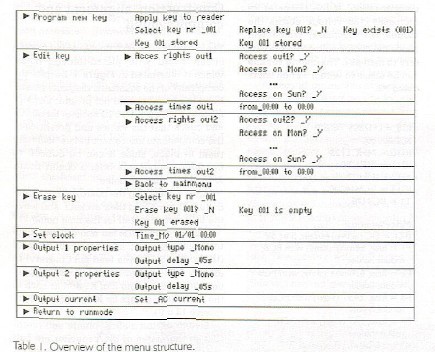
Access privileges are assigned per key at three levels:
-Level 1:
door opener or relay output
For each key and each door opener or relay output, you can specify whether the key is allowed to activate the door opener or the relay.
-Level 2:
restriction to certain days of the week
For each key and each door opener or relay output, you can specify which days of the week the key is allowed to activate the door opener or relay.
-Level 3:
restriction to certain times
An access period can be assigned for each key and each door opener or relay output. The key can activate the door opener or relay output only during this time period.
Note that access privileges at a higher level take priority over access privileges at a lower level. For example, if a key does not provide access to door opener 1 based on Level-1 access privileges, access is effectively denied to the key regardless of what privileges may be assigned at Level 2 or
Building and connecting reader units
For practical use, the iButton probes must be fitted into robust reader units that can be installed adjacent to a door or other type of entrance.
For the prototype, cast aluminium boxes were used for this purpose. Besides an iButton probe, each box was fitted with red and green status LEDs. The necessary connections are shown in Figure 5. 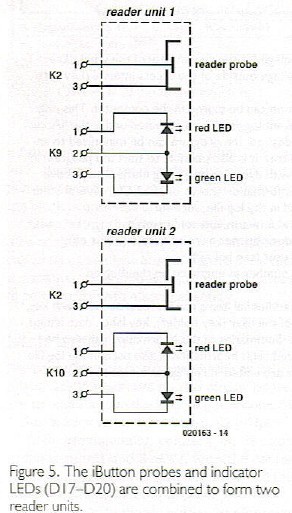
The wiring between the main circuit board and the reader unit can best be made using standard UTP network cable. Make sure that the terminals of the iButton probe are connected using a single twisted pair in the cable, such as blue and blue/white.
For outdoor applications, you should preferably use a DS9092L probe or possibly a DS9092T probe. The DS9092 model is not suitable for outdoor use, since raindrops can cause shorts between the outer contact ring and the contact surface in the middle. The iButtons can be fitted into small holders (type DS9093) that are intended to be attached to a key ring and to which a number can be affixed.
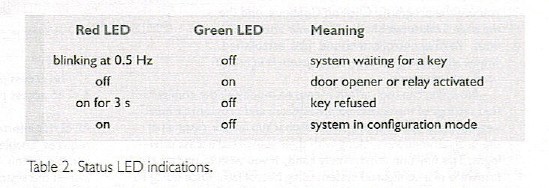
Finally, Table 2 provides a brief summary of the indications provided by the status LEDs.
Reprinted Url Of This Article: http://www.seekic.com/blog/project_solutions/2011/07/28/iAccess__an_intelligent_access_control_system_(6).html
Print this Page | Comments | Reading(423)
Article Categories
New published articles
· Imagination works with TSMC to develop FinFET process
Author:Ecco Reading(48229)
· XMOS pushes event-driven MCUs with lower price
Author:Ecco Reading(4212)
· Intel brings upgraded 32-nm SoC for smartphones
Author:Ecco Reading(3936)
· Micron pushes TLC 128-Gbit NAND flash
Author:Ecco Reading(4676)
· Intel will stop supplying desktop motherboards
Author:Ecco Reading(6019)
· Processor market was expected to regain strength in 2013
Author:Ecco Reading(4013)
· It was reported that TSMC sales fall steeply
Author:Ecco Reading(3682)
· Cisco, NXP work with auto wireless startup
Author:Ecco Reading(4351)
· Micron was impacted by manufacturing glitch
Author:Ecco Reading(4703)
· China can make 22-nm transistor by themselves
Author:Ecco Reading(4567)
· Chip market rebound is coming, according to survey
Author:Ecco Reading(4442)
· Sony, Toshiba will spend more on chips, iSuppli reports
Author:Ecco Reading(4008)
· Qualcomm becomes the 13th company to join NFC Forum board
Author:Ecco Reading(6863)
· TSMC increases building work for FinFET fab
Author:Ecco Reading(4528)
· TI plans to cut 1,700 jobs in OMAP shift
Author:Ecco Reading(5408)