About SeekIC | Services | Payment | Advertisements service | Contact Us | Links
© 2008-2012 SeekIC.com Corp.All Rights Reserved.


Published:2011/8/15 22:24:00 Author:Amy From:SeekIC
Paul Goossens
This completes the trickiest part of the construction.
An example of a suitable module that can be connected to the interface is shown in the PC Home Bus article.
If you prefer to use the I2C bus without the I2C bus-extender, you should make the following modifications: IC5, Rll and R12 can be left out. Pins 3 and 2 on IC5 have to be connected together, as do pins 6 and 7. This is easily done by putting two short wires into the IC socket. The modules may now connect the SCL and SDA lines directly to the I2C connections of their ICs.
If the I/O extender circuit is included on the PCB, it is essential that all connected modules have the input circuit shown in Figure 2. 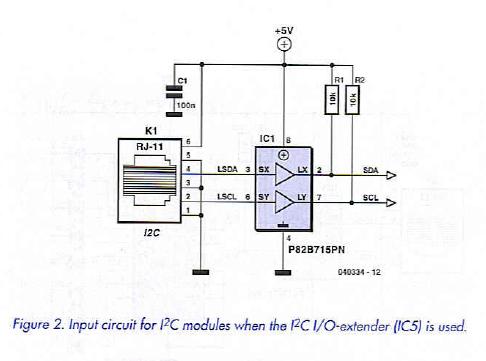
Installation and DLL
Installing the circuit is fairly straightforward. First you have to connect the mains adapter, then you can connect the circuit to the PC using a USB cable.
Windows (from 98SE onwards) will immediately recognize it as a HID device and after some rattling of the hard drive Windows announces that the device is ready for use.
But there is more to it than that of course. We also need to write a program that makes use of the interface. Its functions obviously depend on the modules that are connected and what you want to do with them. We realize that controlling a HID device isn’t exactly a piece of cake for the average programmer. This is why we’ve made a DLL available which was specially written to control our USB interface.
We would recommend that this DLL is copied to the C:\Windovss\System32 folder. This makes the DLL available to the operating system at all times and you don’t have to copy the DLL to the folder where the application using this DLL is stored!
This DLL can be used with any programming language that supports the use of external DLLs. A few examples of such languages are Visual Basic, Visual C++, Delphi and Borland C++ Builder.
Two methods
You can use the DLL from your application in one of two ways. When we wrote the DLL it seemed logical to make the application pass an array of bytes, where the DLL could either store the received bytes or read the bytes to be transmitted.
Most programming languages don’t have a problem with the use of arrays as arguments in DLL functions. But it’s a bit different with Visual Basic. Although it is possible with this programming language, it is a lot trickier for the novice Visual Basic programmer. For this reason we have included a few extra functions and procedures which make it easier to use the interface under Visual Basic.
To help you on your way we have written two simple examples in Visual Basic and Delphi, which control a standard I2C I/O extender. These examples show the two methods in which the DLL can be used.
The circuit of the module required for the examples is shown in Figure 4. The circuit is simple enough for it to be built on a piece of experimenter’s board.
Reprinted Url Of This Article: http://www.seekic.com/blog/project_solutions/2011/08/15/USB_Isup2;C_INTERFACE_I_square_C_rules…_3.html
Print this Page | Comments | Reading(2036)
Author:Ecco Reading(38453)
Author:Ecco Reading(3603)
Author:Ecco Reading(3337)
Author:Ecco Reading(4017)
Author:Ecco Reading(5412)
Author:Ecco Reading(3377)
Author:Ecco Reading(3556)
Author:Ecco Reading(3700)
Author:Ecco Reading(4089)
Author:Ecco Reading(3902)
Author:Ecco Reading(3824)
Author:Ecco Reading(3857)
Author:Ecco Reading(6173)
Author:Ecco Reading(3855)
Author:Ecco Reading(4761)
Response in 12 hours
© 2008-2012 SeekIC.com Corp.All Rights Reserved.