

Project Solutions
Delphi for electronic engineers: Part1-the first steps (2)
Published:2011/8/16 1:45:00 Author:Li xiao na From:SeekIC
Detlef Overbeek & Anton Vogelaar
Altering the settings
The possibility of losing programs can be much reduced by altering o few settings within ihe IDE.
From the menu click on Tools/Environment Options. In the Autosave options tick Editor files and Project desktop. The Delphi settings are then stored when you exit. When Delphi is started again, the IDE will look exactly the same as you last left it.
Tick Show compiler progress in Compiling and running. This option gives you a visual indication as the compilation progresses.
Save these settings by clicking on OK.
From the menu click on Project/Options/Compiler.
Remove the tick from the Sirict var-strinas box in Syntax options to give you more freedom when working with text in the program.
Tick Range checking and Overflow checking in Runtime errors to make fault finding easier during the execution of your programs.
Tick Default to make these settings your default. Save the settings by clicking on OK.
Our first program
We start with a simple program to get the feel of Delphi. We follow that well-known tradition and write a program that shows the text "Hello World" on the screen. Here’s how it’s done:
1. Start a new project by choosing File/New/Application from the menu.
2. Save the new project and give it a name (It’s true that nothing has been entered yet, but this way all changes will be saved automatically with the new name). From the File menu select File/Save All and choose or create a directory where the files will be stored. You will be asked for the names for two files, Unitl !.pas and Projectl.dpr. You should change the name for these files in a way that reflects their function, for example UMain.pas and HelloWorld.dpr. The file Unitl.pas contains the ’Hello World’ program and the file Project 1 .dpr is used by Delphi to store information regarding the project.
3. Now put a TButton component (the 8th icon from the left) from the Standard tab (in the Component palette) on to the Graphic Editor, also called the Form.
4. You can change the size of the form by clicking with the
left mouse button on the bottom-right corner of the Form and dragging it with the mouse, whilst keeping the left button pressed down.
5. One of the properties of the Form object is the text
shown in the title bar. The default is Form I. This can be changed by clicking with the mouse on the Form, making the Object Inspector show the properties of Form 1. Change the text after Caption to ’Hello World’ program.
6. The text on the Burton can be changed by clicking on
the Button, making the Object Inspector show the properties of Button 1, Change the text after Caption to Show. The project should now look like Figure 2. 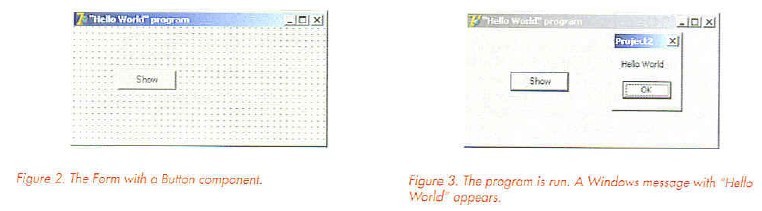
7. If, during the running of this program (from the menu
bar click on Run/Run or press function key F9), we click on the button we want the message Hello World" to appear. But we haven’t got to that stage yet. The TButton type button comes from the VCL library. When we click on this button the component has to know what code should be run. This can be specified in the Object Inspector. Click on the Button to make the Object Inspector show the properties or TButton. Next, click on the Events tab in the Object Inspector. The link next to the OnClick event points to the code that is run when that event occurs.
8. If you double-click on the box to the right of the OnClick event the Code Editor appears. The standard code is provided by Delphi.
This is extended with our code, which is between Begin and End.
The procedure ShowMessage is made available by the operating system, so there is no need for us to write it. A line of Pascal code must end with a ; (semi-colon). Comments can be written after // or between [* ……]or{…….. )
9. The program is then compiled and executed when you
press function key F9 (Figure 3). The directory where we saved the project file Project1.dpr (or any other name we gave it) also contains an executable file, Project1.exe, created by Delphi. This *.exe can be used outside the Delphi IDE for stand-alone use of the program.
Reprinted Url Of This Article: http://www.seekic.com/blog/project_solutions/2011/08/16/Delphi_for_electronic_engineers__Part1_the_first_steps_(2).html
Print this Page | Comments | Reading(419)
Article Categories
New published articles
· Imagination works with TSMC to develop FinFET process
Author:Ecco Reading(30165)
· XMOS pushes event-driven MCUs with lower price
Author:Ecco Reading(3461)
· Intel brings upgraded 32-nm SoC for smartphones
Author:Ecco Reading(3181)
· Micron pushes TLC 128-Gbit NAND flash
Author:Ecco Reading(3660)
· Intel will stop supplying desktop motherboards
Author:Ecco Reading(5231)
· Processor market was expected to regain strength in 2013
Author:Ecco Reading(3248)
· It was reported that TSMC sales fall steeply
Author:Ecco Reading(3390)
· Cisco, NXP work with auto wireless startup
Author:Ecco Reading(3530)
· Micron was impacted by manufacturing glitch
Author:Ecco Reading(3935)
· China can make 22-nm transistor by themselves
Author:Ecco Reading(3707)
· Chip market rebound is coming, according to survey
Author:Ecco Reading(3677)
· Sony, Toshiba will spend more on chips, iSuppli reports
Author:Ecco Reading(3714)
· Qualcomm becomes the 13th company to join NFC Forum board
Author:Ecco Reading(6027)
· TSMC increases building work for FinFET fab
Author:Ecco Reading(3692)
· TI plans to cut 1,700 jobs in OMAP shift
Author:Ecco Reading(4478)