
Signal Processing
Index 37
Electronic Mosquito Repellent circuit
Published:2012/9/26 21:34:00 Author:muriel | Keyword: Electronic, Mosquito Repellent

This electronic mosquitoes repellent circuit is easy to build but is kind of hard to adjust on the exact sound frequency which will reppel the mosquitoes. With frequencies between 2 KHz and 2.5 KHz which mimic male mosquitoes buzz, it seems you can get the best effect.
Mosquitoes Repellent Circuit Diagram
(View)
View full Circuit Diagram | Comments | Reading(1357)
Precise FM Tuning Indicator
Published:2012/9/26 21:33:00 Author:muriel | Keyword: Precise FM, Tuning Indicator

Here is an add on circuit to your FM radio for precise tuning of stations. Usually an LED indicator is provided in FM radio to see whether the station is tuned or not. But it is difficult to see the precise tuning points since the variation in the LED brightness cannot be detected easily. This circuit solves the problem.The circuit uses the Op Amp IC CA3140 as a differential amplifier to sense the voltage level between the terminals of the tuning LED. The output of IC1 drives two LEDs one Red and one Green to indicate whether the station is precisely tuned or not. If both LEDs remain off, it indicates precise tuning. If anyone LED is on, it indicates that tuning is not precise. If both LEDs remain on, it indicates that there is no signal.
Precise FM tuner Circuit
(View)
View full Circuit Diagram | Comments | Reading(1335)
PC Watcher | Turn On and you’ll hear the Alarm
Published:2012/9/25 21:32:00 Author:muriel | Keyword: PC Watcher, Alarm circuit

This little PC Watcher circuit will help you to prevent unauthorised access to your personal computer. After construction on a small piece of veroborad, enclose the whole circuit in a tamper proof plastic box and connect its input to a vacant USB port at the rear of your Desktop PC, using a standard USB cable.Now hide the unit in a suitable place. If anyone tries to switch on your PC, the circuit starts beeping to raise an aural-alert. The alarm function can be disabled by flipping the SPST toggle switch S1 to its ON position. The circuit is “self-powered” ie no additional power supply/battery is required!This alarm circuit is designed using the 14-stage ripple counter CD4060 (IC1). When computer starts running, 5 Volt dc available from its USB port is fed to the circuit through polarity protection diode D1. When IC1 gets power from the PC, it resets through C3 and R1 and starts oscillating. Reservoir capacitor C1 maintains the voltage to IC1 stable so that the oscillation is not affected by slight variations in the USB power line, while capacitor C2 suppresses any unwanted high frequency noise.Resistor R2 and capacitor C4 maintain the oscillation of IC1, as indicated by the beeping of piezo-buzzer connected to its output (pins 3&5) through an npn transistor switch T1. With the components values shown, the buzzer beeps intermittently (after an initial delay of 30 secs) for near 30 secs, then stops for the same period of time and the cycle repeats until the input condition is reversed.
PC On Alarm Circuit Schematic
(View)
View full Circuit Diagram | Comments | Reading(989)
Pressure Sensor Alarm circuit
Published:2012/9/25 21:30:00 Author:muriel | Keyword: Pressure Sensor, Alarm circuit

General purpose circuit of the simple pressure sensor alarm is built around a couple of readily available cheap components. Working of this circuit is straight forward and self-explanatory. When the circuit is powered by a 9V compact battery, the active piezo-sounder at the output of IC1 starts beeping for a short time and then goes into idle state.Whenever, the pressure sensor element (Piezo-ceramic wafer) is gently tapped, mosfet T1 is fired by the electric pulse from the sensor through related components and IC1 is again enabled by T1. As a result, the piezo-sounder starts beeping for a short duration, set by the in-circuit values of R3 and C2. Piezo-sounder at the output of IC1 can be replaced with a low current 6 to 9 V electromagnetic/solid-state relay to control external loads. Likewise, values of components T1,R3 and C2 are not very critical.You can experiment with another values to “tune” the circuit as per your requirements. Pressure sensors (in piezo-wafer form) are widely available with reputed hobby electronics components dealers.
Pressure Sensor Alarm Circuit Schematic
(View)
View full Circuit Diagram | Comments | Reading(1477)
Simple Touch Alarm circuit
Published:2012/9/25 21:29:00 Author:muriel | Keyword: Touch, Alarm circuit

Touch the sensor of the alarm with your finger and it starts beeping, goes on for some time and then stops. Touching it again, and it goes again! This little and flexible circuit consists of a touch sensor and a directly coupled transistor amplifier with a small loudspeaker as the output load. Two sensor strips of metal are mounted side by side on a 1×1 cm size micasheet and connected to the input of the circuit.How the touch alarm works
Under normal conditions no current flows through switching transistors T1 and T2 and the potential across capacitor C1 is almost 0V. If the two touch plates are touched together by a finger, the alarm circuit is enabled by T1 and T2. Transistors T3and T4 form a complimentary pair amplifier, with positive feedback (regeneration) provided to the base of first transistor T3 via R3 and C2.The sound generator oscillates at a frequency determined by C2 and R3 and the bias voltage of T3. The bias voltage of T3 can be changed by changing the values of R2 (and R1). The alarm will provide quite loud audio output into an 8 Ohm speaker with a 9V battery at a current drain of less than 100mA. Needless to say, this is an ultra simple hobby circuit. You can experiment with different component values (R1,R2,C1,C2,R3 and R4, etc) to make your own special alarm!
Touch Alarm Circuit Schematic
(View)
View full Circuit Diagram | Comments | Reading(1696)
Photodiode Alarm circuit
Published:2012/9/25 21:28:00 Author:muriel | Keyword: Photodiode, Alarm circuit
This Photodiode based Alarm can be used to give a warning alarm when someone passes through a protected area. The circuit is kept standby through a laser beam or IR beam focused on to the Photodiode. When the beam path breaks, alarm will be triggered.
The circuit uses a PN Photodiode in the reverse bias mode to detect light intensity. In the presence of Laser / IR rays, the Photodiode conducts and provides base bias to T1. The NPN transistor T1 conducts and takes the reset pin 4 of IC1 to ground potential. IC1 is wired as an Astable oscillator using the components R3, VR1 and C3. The Astable operates only when its resent pin becomes high. When the Laser / IR beam breaks, current thorough the Photodiode ceases and T1 turns off. The collector voltage of T1 then goes high and enables IC1. The output pulses from IC1 drives the speaker and alarm tone will be generated.
Photodiode Alarm Circuit
IR Transmitter Circuit
(View)
View full Circuit Diagram | Comments | Reading(833)
Simple Battery Monitor circuit
Published:2012/9/25 21:25:00 Author:muriel | Keyword: Battery Monitor
This simple Battery Monitor lights an LED when the battery voltage drops below 9 volts. It is an ideal add on circuit to monitor the charge level in 12 volt miniature batteries used in Portable devices or Alarm systems. In the standby state, LED remains off.Working of the circuit is based on the base biasing of transistor T1. When the battery voltage is above 9 volts, base-emitter voltage will be same. This keeps both T1 and LED off. When the battery voltage reduces below 9 volts due to consumption, base voltage of T1 drops while its emitter voltage remains same since capacitor C1 is fully charged. At this stage, base of T1 becomes positive and T1 turns on. Capacitor C1 discharges through the LED and it lights.
Simple Battery Monitor Circuit
(View)
View full Circuit Diagram | Comments | Reading(843)
PC Heat Monitor Circuit
Published:2012/9/25 21:25:00 Author:muriel | Keyword: PC,Heat Monitor
The PC processor generates very high temperature during its operation which is dissipated by the large heat sink placed above the processor. If the heat sink assembly is not tight with the processor or the cooling fan is not working, PC enters into the Thermal shutdown mode and will not boot up. If the PC is not entering into thermal shutdown, the high temperature can destroy the processor. This simple circuit can be placed inside the PC to monitor the temperature near the processor. It gives warning beeps when the temperature near the heat sink increases abnormally. This helps to shutdown the PC immediately before it enters into Thermal shutdown.The circuit uses a Piezo element (one used in Buzzer) as the heat sensor. The piezo crystals reorient when subjected to heat or mechanical stress and generates about one volt through the Direct piezoelectric property. IC1 is designed as a voltage sensor with both the inputs tied through the capacitor C1.The non inverting input is connected to the ground through R1 to keep the output low in the standby state. The inputs of IC1 are very sensitive and even a minute change in voltage level will change the output state.
PC Heat Monitor Circuit
In the standby mode, both the inputs of IC1 are balanced so that output remains low. When the Piezo element accepts heat, it generates a minute voltage which will upset the input balance and output swings high. This triggers LED and Buzzer. Capacitor C2 gives a short lag before the buzzer beeps to avoid false triggering. Warning beep continues till the piezo element cools. (View)
View full Circuit Diagram | Comments | Reading(752)
Wire Break Sensor Alarm circuit
Published:2012/9/25 1:06:00 Author:muriel | Keyword: Wire Break,Sensor,Alarm circuit

Circuit of a loop sensor based simple security alarm is described here. The sensor loop is nothing but a short length of thin enamelled copper wire, which bridges two input points of the electronic alarm circuit. When the loop is opened the alarm circuit fires an active electric/electronic hooter to raise an ear-splitting audio alert signal. The circuit requires 12 volt dc supply for proper working. When the loop is closed, anode terminal of diode D1 is at ground level and transistor T1 is off. When the loop opens, capacitor C1 is quickly charged via resistor R1 and diode D1, whereupon mosfet T1 comes on so that the hooter (BZ1) is switched on. If the loop is closed again, initial condition is maintained by grounding the anode of D1 and this stops the charging of C1. However, C1 is disharged fairly slowly via R2, so that T1 is not switched off immediately! This ensures that the alarm remains active for a little more time and then goes out slowly. This timeout can be changed by varying the value of R1,R2 and C1. Mosfet T1 may be one of many types of popular n-channel power mosfet, but it should be able to handle the selected 12V hooter of your choice.
Wire break alarm circuit schematic
(View)
View full Circuit Diagram | Comments | Reading(3318)
Overflow Indicator circuit
Published:2012/9/25 1:03:00 Author:muriel | Keyword: Overflow Indicator
This Simple circuit can monitor overflow of water from the Overhead tank. The sensor placed close to the lid of the overhead tank always monitor the presence of water coming through the lid and gives a music tone when it senses the over flow. ROM IC UM66 is used to generate melody tone.The circuit is easy to construct. Sensor can be a small piece of common PCB with line tracks. Points A and B are connected to two adjacent tracks using thin plastic wire. Normally T1 is not conducting and no current flows through it. This keeps T2 also non conducting. When water falls on the sensor, electrical conductivity occurs between points A and B though water. This gives base bias to T1 and it conducts to charge C1. When the voltage level in C1 increases, T2 gets base bias and conducts. It gives power to the melody generator IC UM66. Since UM 66 requires 3 volts, Zener diode ZD is used to regulate the supply of UM 66 to 3 volts. Output pulses from UM 66 are amplified by T3 and the Speaker gives Music tone. The music tone continues till the overflow water ceases.
Overflow Indicator Circuit
The unit can be placed in the room for easy monitoring. Fix the sensor close to the lid of the overhead tank. Connect the sensor with the points A and B using long plastic wire. Since the copper tracts in the sensor may corrode due to weathering, periodic cleaning or replacement is necessary. To avoid this two brass pins or screws can be used. But these should be arranged closely with minimum spacing of 2mm between them. Then only current passes through water and the brass pins. (View)
View full Circuit Diagram | Comments | Reading(892)
Telephone Tapping Indicator
Published:2012/9/25 0:58:00 Author:muriel | Keyword: Telephone,Tapping, Indicator

This simple circuit can indicate a misuse or tapping of Telephone line through a loud alarm. The circuit is too simple and can be easily assembled on a common PCB.Line voltage of Telephone lines is around 48 volts DC in the On hook state. When the handset is lifted, this voltage reduces to 12 volt DC. This change in voltage level is used to activate the circuit. When the switch S1 is closed, circuit becomes active and the telephone enters into the armed state. The high volt DC from the telephone line passes through R1 and VR1 and bias T1 into conduction. As a result, the collector of T1 goes to ground potential to inhibit T2 from conduction. Buzzer and LED thus remain off.When the handset is lifted, the DC voltage from the telephone lines drops to 12 volts. This turns off T1 and T2 conducts. Buzzer beeps and LED lights indicating that the telephone is using.
Telephone Tapping Indicator Circuit
(View)
View full Circuit Diagram | Comments | Reading(910)
Door ajar alarm circuit
Published:2012/9/25 0:58:00 Author:muriel | Keyword: Door,ajar,alarm circuit

Ever accidentally left your front door ajar and had a pet escape? Here is a smart solution to this problem. The circuit is fairly simple but a great example of using a tiny circuit to get the job done. All you need is a CD4011 IC plus a handful of components. In this door ajar alarm/beeper circuit, a bar magnet-reed switch combination is used as the door sensor. When the door is closed, as per mechanical arrangement, the bar magnet near the reed switch close its switch contacts. Now the beeper circuit built around CD4011 (IC1) is disabled by the logic low state at its input terminals (pins 1&12).When door is opened the beeper is enabled by the logic high state and the speaker starts beeping intermittently at a rate of about 0.5 secs on/0.5 secs off. Frequeny of this gated aural output is near 450 Hz. After assembling, enclose the circuit including the reed switch, in a plastic enclosure and mount it on the door frame.Next fit the bar magnet in the door exactly in alignment with the reed switch so that when door is closed the bar magnet is at the close vicinity of the reed switch. For powering the circuit, use an alkaline type 9V compact battery.
Door ajar beeper/alarm circuit schematic
(View)
View full Circuit Diagram | Comments | Reading(1322)
Invisible Infrared Alarm Circuit
Published:2012/9/25 0:49:00 Author:muriel | Keyword: Invisible,Infrared,Alarm Circuit


This circuit uses Invisible Infrared light to detect the movement of people through the door. A short beep will be generated when the infrared beam breaks. So it is ideal to monitor the passages in shops, banks etc where many people are moving.
Two Infrared LEDs always emit continuous infrared beam to the Photodiode. The IR LEDs and Photodiode are placed on the opposite frames of the door and properly aligned. Resistor R1 is the current limiter giving around 70 mA current through the LEDs which is necessary to increase the output of IRLEDs.IC1 is designed as Current to Voltage converter with the reverse biased photodiode connected to its inverting input. The non inverting input is directly grounded.
Resistor R2 and VR1 forms the feedback loop to adjust the sensitivity of the IC. Normally the Photodiode generates a small current by accepting the energy from the infrared Beam. This tiny current will be amplified by IC1 and gives a high output. This forward biases T1 and it conducts. The emitter current from T1 keeps T2 off since it is a PNP transistor. Since T2 is off, Buzzer remains silent. In short, in the standby mode, LED glows indicating the active state of circuit and buzzer remains off.
Infrared Invisible Alarm Circuit
When a person crosses the infrared beam, Photodiode turns off and the output of IC1 turns low. T1 then cutoff and T2 forward biases. This activates the buzzer for a short period.
IR LED and Photodiode
Note: Proper alignment of infrared LEDs and Photodiode is necessary. After orienting the IR LEDs to the photodiode, adjust VR1 till Red LED turns on and buzzer stops beeping. This is the standby mode. Mask photodiode with hand. Buzzer should beep. The circuit is ready to use.?
16 Responses to “Invisible Infrared Alarm Circuit”
(View)
View full Circuit Diagram | Comments | Reading(2262)
Remote Controlled Alarm circuit
Published:2012/9/24 22:28:00 Author:muriel | Keyword: Remote,Controlled,Alarm
A very interesting remote controlled alarm circuit using TSOP1736. Routing of an electric cable to attach a calling bell switch near the bed of an old age/patient is not a good idea. Here is an ultra simple battery operated remote controlled alarm to help old age members/patients in bed, especially at home/hospital. Any tv/video infrared remote control handset (36Khz) can be used to arm the alarm!How does the remote controlled sound alarm worksAt the heart of the circuit is the popular integrated infrared sensor TSOP1736.The TSOP1736 is a miniaturized receiver for infrared remote control systems. PIN diode and preamplifier are assembled on lead frame, the epoxy package is designed as an infrared filter. Further, a bandpassfilter, an integrator stage and an automatic gain control are used to suppress unwanted noise disturbances.When a person needs immediate attention of someone, he should firmly press and hold any button in the keyapad of the remote control handset and aim the handset towards the sensor (IRRX) of the alarm circuit. Instantly, the active piezo-buzzer stars beeping in tune with the modulated infrared signals emitted by the handset. Sametime, a good visual alert is provided by the red colored 10mm LED(D2).
After construction, enclose the whole remote controlled siren unit in a transparent cabinet with the Infrared sensor at the front side of the box. Now power the circuit through a suitable 9V compact alkaline battery. Insertion of an ordinary on/off toggle switch in the positive rail is a good idea. After successful testing, mount the unit in a proper point at the wall of the room/hall, as per the requirement. Finally, the lab prototype is connected to a multidirectional 5V dc buzzer. However, you can use an ordinary 5V dc buzzer or any kind of 5V active piezo-sounder.
Remote Controlled Audio Alarm Circuit Schematic
(View)
View full Circuit Diagram | Comments | Reading(738)
Temperature Alarm circuits
Published:2012/9/24 22:27:00 Author:muriel | Keyword: Temperature Alarm

This simple Over heat alarm is to monitor heat generating devices such as motor, inverter etc. The alarm will beep and LED blinks when the temperature of the device increases abnormally.The circuit is a simple Astable multivibrator using the low power CMOS timer IC 7555 which is the low power version of the popular 555 IC. The reset pin 4 of IC1 is used to activate the alarm. The astable will work only if the reset pin 4 becomes high. The reset pin is connected to the positive rail through the 10 K NTC thermister. The NTC (Negative Temperature Coefficient) thermister offers high resistance in cold and its resistance becomes low to few ohms when the temperature in its vicinity increases. So when the temperature is low (as adjusted by the position of the thermister near the device) reset pin of IC1 remains low and astable is in off position and buzzer remains silent. When the temperature near the thermister increases, its resistance decreases and provides voltage to the reset pin of IC1 and the astable starts working.
Temperature alarm circuit
(View)
View full Circuit Diagram | Comments | Reading(2528)
Sensitive Freezer Alarm with Buzzer
Published:2012/9/24 4:20:00 Author:muriel | Keyword: Sensitive, Freezer Alarm

Here is a simple freezer alarm circuit, but ultra sensitive with a buzzer. The circuit raises an audio alert when the temperature inside the freezer box goes up above a preset level. The circuit requires 9V dc supply and can power from a standard 9V alkaline battery.A negative temperature co-efficient type (NTC type) small thermistor (R1) here works as the freezer status sensor. Related components (T1 and T2) are used to drive a 6 to 9V rated mechanical buzzer. When the sensor detects a temperature shoot, the buzzer starts beeping and remains in that condition, till power to the circuit is removed. For this on/off plus reset function any small dc toggle switch can be inserted at the positive rail.
Freezer Alarm Circuit Schematic
?
2 Responses to “Sensitive Freezer Alarm with Buzzer”
(View)
View full Circuit Diagram | Comments | Reading(1425)
Small FM Receiver Circuit
Published:2012/9/20 21:04:00 Author:Ecco | Keyword: Small , FM Receiver
This is the most simple fm radio receiver with good performances that works great even if the sensitivity is not too high. The working principle of this fm receiver may seem a little unusual. It is made of an oscillator (T2 and T3) that is synchronized with the received frequency of T1. This transistor works as a broadband preamplifier in VHF range.The oscillator is adjusted between 87 … 108 MHz with C5. Because of the synchronization, the oscillator output will have the same frequency deviation as the received signal from the fm antenna. This deviations are caused by the broadcasted audio informations. The frequency modulated signal show up on P1 + R5. Low pass filter R6/C6 extracts the audio signal and then is amplifier by T4 … T6 and transmitted at the output through C9 capacitor.
FM Receiver Circuit Diagram
The coil details are presented in the fm receiver circuit diagram. The radio receiver is adjusted on different stations with the help of C5. P1 potentiometer is adjusted untill the best reception is obtained. If we attach an audio amplifier and a speaker then this fm receiver can be made very compact as a pocket radio.?
72 Responses to “Small FM Receiver Circuit”
(View)
View full Circuit Diagram | Comments | Reading(1267)
Rain Sound Effects Generator circuit
Published:2012/9/19 21:43:00 Author:Ecco | Keyword: Rain Sound Effects , Generator

This rain sound effects generator circuit simulates the rain noise and may be used in the field of electronic music and radio shows. As a noise source we use a germanium diode that is directly polarized then is amplifier by a single stage amplifier in order to obtain an acceptable audio level.A high-pass filter with an adjustable lower limit, built with P1 and C3, allow coverage of the entire range of sound effects from light rain and to torrential rain.The current consumption is low so you can use a 9V battery. Instead of BC107 you can use any NPN transistor.
Rain Sound Effects Circuit Schematic
?
10 Responses to “Rain Sound Effects Generator circuit”
Source: electroschematic.com
(View)
View full Circuit Diagram | Comments | Reading(2183)
Telephone ringtone generator circuit
Published:2012/9/18 21:39:00 Author:Ecco | Keyword: Telephone ringtone generator
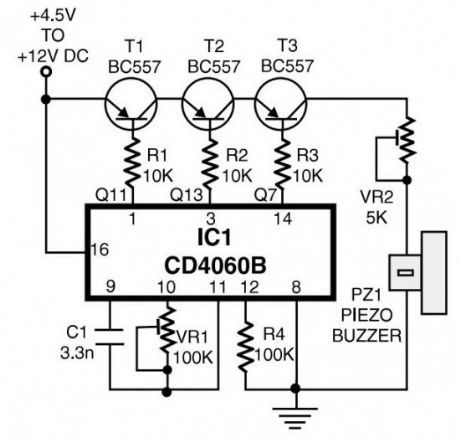
This is a simple home telephone ringtone generator circuit which is built with applying only several electronic components / parts. It generates simulated telephone ringtone and requires only DC supply with 4.5V DC to 12V DC voltage.One may possibly use this circuit in ordinary intercom or phone-type intercom. The sound is pretty loud when this circuit is operated on +12V DC power supply. Even so, the volume of ring sound can be adjusted.
Ringtone generator circuit schematic
CD4060B is chosen to produce three kinds of pulses. Preset VR1 is fine-tuned to get 0.3125Hz pulses at pin 3 of IC1. At the same time, pulses obtainable from pin 1 will be of 1.25 Hz and 20 Hz at pin 14. The three output pins of IC1 are connected to base terminals of transistors T1, T2, and T3 through resistors R1, R2, and R3, respectively.
Working with a built-in oscillator-type piezobuzzer generates about 1kHz tone. In this particular circuit, the piezo-buzzer is turned ‘on’ and ‘off’ at 20 Hz for ring tone sound by transistor T3. 20Hz pulses are obtainable at the collector of transistor T3 for 0.4-second duration. Just after a time interval of 0.4 second, 20Hz pulses become again obtainable for another 0.4-second duration. This is followed by two seconds of nosound interval. Thereafter the pulse pattern repeats by itself.
11 Responses to “Telephone ringtone generator circuit”
(View)
View full Circuit Diagram | Comments | Reading(1251)
1KHz square wave generator circuit
Published:2012/9/18 21:24:00 Author:Ecco | Keyword: 1KHz, square wave generator

You can build a simple 1KHz square wave generator using a few components and the LM3909 that is useful for testing audio equipment. It is powered from a single 1.5V battery cell and the maximum amplitude of the output signal is 1.1V. With P1 you can adjust the symmetry of the square wave signal and with P2 the amplitude.Square wave generator schematic
3 Responses to “1KHz square wave generator circuit”
Source: electroschematics.com
(View)
View full Circuit Diagram | Comments | Reading(1336)
| Pages:37/195 At 202122232425262728293031323334353637383940Under 20 |
Circuit Categories
power supply circuit
Amplifier Circuit
Basic Circuit
LED and Light Circuit
Sensor Circuit
Signal Processing
Electrical Equipment Circuit
Control Circuit
Remote Control Circuit
A/D-D/A Converter Circuit
Audio Circuit
Measuring and Test Circuit
Communication Circuit
Computer-Related Circuit
555 Circuit
Automotive Circuit
Repairing Circuit